Quick Start
Get Open WebUI running on your machine. Pick your preferred method below.
Open WebUI works on macOS, Linux (x86_64 and ARM64, including Raspberry Pi and NVIDIA DGX Spark), and Windows.
- Docker: Officially supported and recommended for most users. Requires Docker installed.
- Python: Suitable for low-resource environments or manual setups
- Kubernetes: Ideal for enterprise deployments requiring scaling and orchestration
- Docker
- Python
- Kubernetes
- Desktop
- Third Party
- Docker
- Docker Compose
- Extension
- Podman
- Quadlets
- Kube Play
- Swarm
- WSL
Requires Docker. Replace your-secret-key with the output of openssl rand -hex 32, then run the command below; it pulls the image and starts it:
docker run -d -p 3000:8080 --add-host=host.docker.internal:host-gateway -v open-webui:/app/backend/data -e WEBUI_SECRET_KEY=your-secret-key --name open-webui --restart always ghcr.io/open-webui/open-webui:main| Flag | What it does |
|---|---|
-p 3000:8080 | The UI is on port 3000 of your machine. Change the left number if 3000 is taken. |
-v open-webui:/app/backend/data | Your chats, users and settings live in this volume. It survives updates; never run without it. |
--add-host=host.docker.internal:host-gateway | Lets the container reach Ollama, or anything else, running on your machine. |
--restart always | Comes back after a reboot. |
-e WEBUI_SECRET_KEY=your-secret-key | Set it once and keep it. Without a fixed key, every recreated container logs everyone out. Generate one with openssl rand -hex 32. |
Image Variants
| Tag | Use case |
|---|---|
:main | Standard image (recommended). Everything included: the app plus the bundled speech-to-text and embedding models. |
:dev | Pre-release (nightly) build from the dev branch. Fixes and features arrive here first. See Using the Dev Branch. |
:main-slim | Small image for deployments that use external services for embeddings, speech and vector storage, see What slim leaves out |
:cuda | Nvidia GPU support, CUDA 12.8 (add --gpus all to docker run) |
:cuda126 | Same as :cuda, built against CUDA 12.6 |
:ollama | Bundles Ollama inside the container for an all-in-one setup |
Channel and variant combine: :dev-slim, :dev-cuda, :dev-cuda126 and :dev-ollama all exist. Slim is a variant of its own, so there is no cuda-slim or ollama-slim. The bare variant names :slim, :cuda, :cuda126 and :ollama are aliases of the main build.
What slim leaves out
The dev builds after v0.11.3 rebuilt slim from the ground up, and this section describes that build. It is what :dev-slim serves today and what :main-slim becomes with the next release. Until then, :main-slim is still the previous slim, which is the standard image with only the pre-downloaded model files removed, about 1.5 GB compressed on amd64.
The rebuilt slim image is about 170 MB compressed per architecture, against about 1.6 GB for the standard image on amd64. It gets there by leaving out every local machine learning runtime and the packages that depend on one, so it is an image for deployments where those jobs are done by other services.
| Left out | What to use instead |
|---|---|
Local embedding model (sentence-transformers, transformers, torch) | Set RAG_EMBEDDING_ENGINE to ollama, openai or azure_openai. Until you do, document upload and retrieval answer 503 Configure an external embedding engine. |
Local speech-to-text (faster-whisper) | Pick an external speech-to-text engine in the admin settings, or leave it unused. |
| Local reranking | Use an external reranker, or clear the reranking model to fall back to cosine scoring. |
| Embedded Chroma and every vector database client except pgvector | VECTOR_DB defaults to pgvector. Point PGVECTOR_DB_URL, or DATABASE_URL, at a PostgreSQL server with the pgvector extension. Any other VECTOR_DB value fails with a 503 that says so. |
Document loaders for PDF and Office files, plus ffmpeg and pandoc | Plain text, Markdown, reStructuredText, XML, CSV and HTML files still load locally. For anything else, set an external content extraction engine such as Tika, Docling or Azure Document Intelligence. |
| Cloud storage clients for S3, Google Cloud Storage and Azure Blob | Local storage only. |
git and the build toolchain | Tools and functions whose requirements install from git need the standard image. |
Slim is a variant of its own. It cannot be combined with USE_CUDA or USE_OLLAMA, so there is no CUDA or Ollama flavor of it.
When slim saves anything
Always, with this build. There are no model files to fetch, so nothing is downloaded at first start or on first use, and OFFLINE_MODE=true has nothing left to block. The one exception is the token text splitter, which fetches the tiktoken encoding the first time it is selected.
If you were running the previous slim to save a download, note that the trade has changed. That image kept every feature and fetched the models on demand. This one keeps the download small by handing embeddings, speech, reranking, vector storage and document parsing to services you run or subscribe to. A single-container setup that relies on the built-in local models wants :main.
How the tags update
:main and :latest are the same rolling image: both point to the newest build from the main branch and are rebuilt every time a change lands there, so their digest moves forward as development continues. Note that :latest follows main; it does not point to the newest stable release.
:dev is the same idea for the dev branch, also rolling. That is the pre-release, effectively a nightly build, and it carries fixes and features weeks before they appear under :main.
Version tags, such as :vX.Y.Z and the shorter :X.Y.Z, are pinned to one stable release and never change. :X.Y follows the newest patch release of that minor line. :git-<short-sha> pins one exact commit.
This is why :main and a specific release tag can show different image digests at the same time: :main already includes everything merged since that release, while the version tag stays frozen at it.
| Tag | Points to | Immutable? |
|---|---|---|
:main, :latest | Newest build of the main branch | No (rolling) |
:dev | Newest build of the dev branch, the pre-release | No (rolling) |
:vX.Y.Z, :X.Y.Z | A specific stable release | Yes |
:X.Y | The newest patch release of that minor line | No (rolling within the minor) |
:git-<sha> | One exact commit | Yes |
For reproducible or production deployments, pin a version tag. For the newest build, use :main (or the identical :latest). For the next release before it is released, use :dev.
Specific release versions
For production environments, pin a specific version instead of using floating tags. Replace X.Y.Z with a version from the releases page:
docker pull ghcr.io/open-webui/open-webui:vX.Y.Z
docker pull ghcr.io/open-webui/open-webui:vX.Y.Z-cuda
docker pull ghcr.io/open-webui/open-webui:vX.Y.Z-ollamaThe same images are mirrored to Docker Hub as openwebui/open-webui, but only a subset: latest, latest-<variant> and the bare <variant> tags (for example slim, cuda, ollama) follow main, and X.Y.Z / X.Y, with or without a variant suffix, follow releases. :main, :dev, :vX.Y.Z and :git-<sha> exist on ghcr.io only, which is why every command in these docs uses ghcr.io/open-webui/open-webui.
Common Configurations
GPU support (Nvidia)
docker run -d -p 3000:8080 --gpus all --add-host=host.docker.internal:host-gateway -v open-webui:/app/backend/data -e WEBUI_SECRET_KEY=your-secret-key --name open-webui --restart always ghcr.io/open-webui/open-webui:cudaBundled with Ollama
A single container with Open WebUI and Ollama together:
With GPU:
docker run -d -p 3000:8080 --gpus=all -v ollama:/root/.ollama -v open-webui:/app/backend/data -e WEBUI_SECRET_KEY=your-secret-key --name open-webui --restart always ghcr.io/open-webui/open-webui:ollamaCPU only:
docker run -d -p 3000:8080 -v ollama:/root/.ollama -v open-webui:/app/backend/data -e WEBUI_SECRET_KEY=your-secret-key --name open-webui --restart always ghcr.io/open-webui/open-webui:ollamaConnecting to Ollama on a different server
docker run -d -p 3000:8080 -e OLLAMA_BASE_URL=https://example.com -v open-webui:/app/backend/data -e WEBUI_SECRET_KEY=your-secret-key --name open-webui --restart always ghcr.io/open-webui/open-webui:mainSingle-user mode (no login)
docker run -d -p 3000:8080 --add-host=host.docker.internal:host-gateway -e WEBUI_AUTH=False -v open-webui:/app/backend/data -e WEBUI_SECRET_KEY=your-secret-key --name open-webui --restart always ghcr.io/open-webui/open-webui:mainYou cannot switch between single-user mode and multi-account mode after this change.
Using the Dev Branch
:dev is Open WebUI's pre-release channel, and in practice a nightly build: the image is rebuilt from the dev branch as changes land, and every change lands there before it lands anywhere else. There is no separate beta programme, because dev fills that role. Changes that reach it are not reverted, so the next release is dev as it stands on release day.
That has two consequences worth knowing:
- If you are waiting on a fix, it is probably already available. Check the changelog on
dev, then run:devrather than waiting for the release. - If you run Open WebUI for other people, testing the pre-release is how you avoid surprises. A second instance on
:devshows you the next release before your users meet it, and tells you whether your plugins, your models and your configuration still behave.
Whether to run it is entirely your decision, and running it is what makes releases good. A pre-release is only as well tested as the number of people who choose to install it, and that number is currently small.
Setup is the same as any other image, with the tag changed:
docker run -d -p 3001:8080 --add-host=host.docker.internal:host-gateway -v open-webui-dev:/app/backend/data -e WEBUI_SECRET_KEY=your-secret-key --name open-webui-dev --restart always ghcr.io/open-webui/open-webui:devNever share a data volume between dev and production. Dev builds may include database migrations that a release image cannot read back, so a shared volume can leave you unable to go back to :main. The -v open-webui-dev:/app/backend/data above is a different volume from the open-webui one used on the Quick Start, and that is deliberate. The container name differs too, so both can run at once.
Anything that looks wrong on :dev is worth reporting on GitHub. Reports at that stage get fixed before the release instead of after it, which is the whole point of a pre-release existing.
If Docker is not your preference, follow the Developing Open WebUI.
Uninstall
With docker run
-
Stop and remove the container:
docker rm -f open-webui -
Remove the image (optional):
docker rmi ghcr.io/open-webui/open-webui:main -
Remove the volume (optional, deletes all data):
docker volume rm open-webui
Updating
To update your local Docker installation to the latest version, you can either use Watchtower or manually update the container.
Option 1: Using Watchtower
With Watchtower, you can automate the update process:
docker run --rm --volume /var/run/docker.sock:/var/run/docker.sock nickfedor/watchtower --run-once open-webui(Replace open-webui with your container's name if it's different.)
Option 2: Manual Update
-
Stop and remove the current container:
docker rm -f open-webui -
Pull the latest version:
docker pull ghcr.io/open-webui/open-webui:main -
Start the container again:
docker run -d -p 3000:8080 -v open-webui:/app/backend/data \
  -e WEBUI_SECRET_KEY="your-secret-key" \
  --name open-webui --restart always \
  ghcr.io/open-webui/open-webui:main
Without a persistent WEBUI_SECRET_KEY, you'll be logged out every time the container is recreated. Generate one with openssl rand -hex 32.
For version pinning, rollback, automated update tools, and backup procedures, see the full update guide.
Save this as docker-compose.yml, replace the secret key with the output of openssl rand -hex 32, then run docker compose up -d:
services:
  open-webui:
    image: ghcr.io/open-webui/open-webui:main
    ports:
      - "3000:8080"
    volumes:
      - open-webui:/app/backend/data
    extra_hosts:
      - host.docker.internal:host-gateway
    environment:
      - WEBUI_SECRET_KEY=your-secret-key
    restart: unless-stopped

volumes:
  open-webui:
extra_hosts makes host.docker.internal resolve to the host on Linux. With no OLLAMA_BASE_URL set, the image looks for Ollama at http://host.docker.internal:11434 (then :12434), so this line is what lets it reach an Ollama running on the host.
To update, run docker compose pull and then docker compose up -d. The Watchtower command on the Updating tab targets a container named open-webui; Compose names this one <project>-open-webui-1 unless you add container_name: open-webui to the service.
The tags are the same as on the Docker tab: change the image: line. To try :dev, add it as a second service with its own volume and port, see Running the pre-release image. Use Docker Compose v2 (docker compose, with a space).
The sections below extend the docker-compose.yml above.
Warning: Older Docker Compose tutorials may reference version 1 syntax, which uses commands like docker-compose build. Ensure you use version 2 syntax, which uses commands like docker compose build (note the space instead of a hyphen).
Running the pre-release image
:dev is Open WebUI's pre-release channel, and in practice a nightly build: every change lands on the dev branch before it lands anywhere else, and the next release is dev as it stands on release day. Running it on a second instance shows you that release early, and anything you report gets fixed before it ships rather than after.
Change the tag and, importantly, give it a separate volume and a separate port:
services:
  openwebui-dev:
    image: ghcr.io/open-webui/open-webui:dev
    ports:
      - "3001:8080"
    volumes:
      - open-webui-dev:/app/backend/data
    extra_hosts:
      - host.docker.internal:host-gateway
    environment:
      - WEBUI_SECRET_KEY=your-dev-secret-key
    restart: unless-stopped
volumes:
open-webui-dev:Dev builds may include database migrations that a release image cannot read back, so a shared volume can leave you unable to go back to :main. Keep open-webui-dev as its own volume, as above.
Add this as a second service alongside your normal one and both run at the same time, on ports 3000 and 3001. Report anything that looks wrong on GitHub. A pre-release is only as well tested as the number of people who choose to install it, so this is the single most useful thing an operator can contribute.
GPU support with Compose
Note: For Nvidia GPU support, you change the image from ghcr.io/open-webui/open-webui:main to ghcr.io/open-webui/open-webui:cuda and add the following to your service definition in the docker-compose.yml file:
deploy:
  resources:
    reservations:
      devices:
        - driver: nvidia
          count: all
          capabilities: [gpu]
This setup ensures that your application can leverage GPU resources when available. The :cuda image moves Open WebUI's own local models (embedding, reranking, and Whisper speech-to-text) to the GPU; Ollama's models use a GPU only if the Ollama container has one. If no GPU is visible, the image falls back to the CPU without an error. For the pre-release channel the tag is :dev-cuda.
Helper Scripts
A set of helper scripts is included with the codebase to streamline common Docker workflows:
docker-compose-launcher.sh: Interactive Compose launcher with GPU auto-detection, configurable WebUI/API ports, a host data mount for Ollama's models, and optional Playwright support. Run./docker-compose-launcher.sh --helpfor the full list of flags. Use--dropto tear down the project.docker-cleanup.sh: Stops the Compose project and deletes all volumes, including persistent data. Prompts for confirmation before destroying data.docker-run.sh: Builds the Open WebUI image and runs a single container, exposing it onOPEN_WEBUI_PORT(default3000). It sets noWEBUI_SECRET_KEY, so add one to itsdocker runline before using the container for anything beyond a quick test.docker-ollama.sh: Pulls and runs the official Ollama container with optional GPU passthrough, exposing it onOLLAMA_PORT(default11434).docker-update-models.sh: Iterates through every model installed in the Ollama container and pulls the latest version.
Uninstall
-
Stop and Remove the Services: Run this command in the directory containing your
docker-compose.ymlfile:docker compose down -
Remove the Volume (Optional, WARNING: Deletes all data): If you want to completely remove your data (chats, settings, etc.):
docker compose down -vOr manually:
docker volume rm <your_project_name>_open-webui -
Remove the Image (Optional):
docker rmi ghcr.io/open-webui/open-webui:main
Docker Desktop Extension
Docker has released an Open WebUI Docker extension that uses Docker Model Runner for inference. You can read their getting started blog here: Run Local AI with Open WebUI + Docker Model Runner
You can find troubleshooting steps for the extension in their Github repository: Open WebUI Docker Extension - Troubleshooting
While this is an amazing resource to try out Open WebUI with little friction, it is not an officially supported installation method - you may run into unexpected bugs or behaviors while using it. For example, you are not able to log in as different users in the extension since it is designed to be for a single local user. If you run into issues using the extension, please submit an issue on the extension's Github repository.
Using Podman
Podman is a daemonless container engine for developing, managing, and running OCI Containers.
Basic Commands
-
Run a Container:
podman run -d --name openwebui -p 3000:8080 -v open-webui:/app/backend/data -e WEBUI_SECRET_KEY=your-secret-key ghcr.io/open-webui/open-webui:main -
List Running Containers:
podman ps
Networking with Podman
If networking issues arise (specifically on rootless Podman), you may need to adjust the network bridge settings.
Older Podman instructions often recommended slirp4netns. However, slirp4netns is being deprecated and will be removed in Podman 6.
The modern successor is pasta, which is the default in Podman 5.0+.
Accessing the Host (Local Services)
If you are running Ollama or other services directly on your host machine, use the special DNS name host.containers.internal to point to your computer.
Modern Approach (Pasta - Default in Podman 5+)
No special flags are usually needed to access the host via host.containers.internal.
Legacy Approach (Slirp4netns)
If you are on an older version of Podman and pasta is not available:
- Ensure you have slirp4netns installed.
- Start the container with the following flag to allow host loopback:
podman run -d --network=slirp4netns:allow_host_loopback=true --name openwebui -p 3000:8080 -v open-webui:/app/backend/data -e WEBUI_SECRET_KEY=your-secret-key ghcr.io/open-webui/open-webui:mainConnection Configuration
Once inside Open WebUI, go to your avatar > Settings > Admin > Connections and set your Ollama API connection to:
http://host.containers.internal:11434
To have it set before the first start instead, add -e OLLAMA_BASE_URL=http://host.containers.internal:11434 to the podman run command. The image's default, http://host.docker.internal:11434, does not resolve under Podman.
Refer to the Podman documentation for advanced configurations.
Uninstall
To uninstall Open WebUI running with Podman, follow these steps:
-
Stop and Remove the Container:
podman rm -f openwebui -
Remove the Image (Optional):
podman rmi ghcr.io/open-webui/open-webui:main -
Remove the Volume (Optional, WARNING: Deletes all data): If you want to completely remove your data (chats, settings, etc.):
podman volume rm open-webui
Podman Quadlets (systemd)
Podman Quadlets allow you to manage containers as native systemd services. This is the recommended way to run production containers on Linux distributions that use systemd (like Fedora, RHEL, Ubuntu, etc.).
🛠️ Setup
-
Create the configuration directory: For a rootless user deployment:
mkdir -p ~/.config/containers/systemd/ -
Create the container file: Create a file named
~/.config/containers/systemd/open-webui.containerwith the following content:[Unit] Description=Open WebUI Container After=network-online.target [Container] Image=ghcr.io/open-webui/open-webui:main ContainerName=open-webui PublishPort=3000:8080 Volume=open-webui:/app/backend/data Environment=WEBUI_SECRET_KEY=your-secret-key # Networking: Pasta is used by default in Podman 5+ # If you need to access host services (like Ollama on the host): AddHost=host.containers.internal:host-gateway Environment=OLLAMA_BASE_URL=http://host.containers.internal:11434 [Service] Restart=always [Install] WantedBy=default.target -
Reload systemd and start the service:
systemctl --user daemon-reload systemctl --user start open-webui -
Enable auto-start on boot:
systemctl --user enable open-webui
📊 Management
-
Check status:
systemctl --user status open-webui -
View logs:
journalctl --user -u open-webui -f -
Stop service:
systemctl --user stop open-webui
To update the image, simply pull the new version (podman pull ghcr.io/open-webui/open-webui:main) and restart the service (systemctl --user restart open-webui).
Podman Kube Play Setup
Podman supports Kubernetes like-syntax for deploying resources such as pods, volumes without having the overhead of a full Kubernetes cluster. More about Kube Play.
If you don't have Podman installed, check out Podman's official website.
Example play.yaml
Here is an example of a Podman Kube Play file to deploy:
apiVersion: v1
kind: Pod
metadata:
  name: open-webui
spec:
  containers:
    - name: container
      image: ghcr.io/open-webui/open-webui:main
      env:
        - name: WEBUI_SECRET_KEY
          value: your-secret-key
      ports:
        - name: http
          containerPort: 8080
          hostPort: 3000
      volumeMounts:
        - mountPath: /app/backend/data
          name: data
  volumes:
    - name: data
      persistentVolumeClaim:
        claimName:  open-webui-pvc
---
apiVersion: v1
kind: PersistentVolumeClaim
metadata:
  name: open-webui-pvc
spec:
  accessModes:
    - ReadWriteOnce
  resources:
    requests:
      storage: 5Gi
Starting
To start your pod, run the following command:
podman kube play ./play.yamlUsing GPU Support
The :cuda image moves Open WebUI's own local models (embedding, reranking, and Whisper speech-to-text) to the GPU; Ollama's models are unaffected. For Nvidia GPU support, you need to replace the container image with ghcr.io/open-webui/open-webui:cuda and need to specify the device (GPU) required in the pod resources limits as followed:
      [...]
      resources:
        limits:
          nvidia.com/gpu=all: 1
[...]To successfully have the open-webui container access the GPU(s), you will need to have the Container Device Interface (CDI) for the GPU you wish to access installed in your Podman Machine. You can check Podman GPU container access.
Docker Swarm
This installation method requires knowledge on Docker Swarms, as it utilizes a stack file to deploy 3 seperate containers as services in a Docker Swarm.
It includes isolated containers of ChromaDB, Ollama, and OpenWebUI. Additionally, there are pre-filled Environment Variables to further illustrate the setup.
This stack correctly deploys ChromaDB as a separate HTTP server container, with Open WebUI connecting to it via CHROMA_HTTP_HOST and CHROMA_HTTP_PORT. This is required for any multi-worker or multi-replica deployment.
The default ChromaDB mode (without CHROMA_HTTP_HOST) uses a local SQLite-backed PersistentClient that is not fork-safe: concurrent writes from multiple worker processes will crash workers instantly. Running ChromaDB as a separate server avoids this by using HTTP connections instead of direct SQLite access.
If you plan to scale the openWebUI service to multiple replicas, you should also switch to PostgreSQL for the main database and set up Redis. See the Scaling & HA guide for full requirements.
Choose the appropriate command based on your hardware setup:
-
Before Starting:
Directories for your volumes need to be created on the host, or you can specify a custom location or volume.
The current example utilizes an isolated dir
data, which is within the same dir as thedocker-stack.yaml.-
For example:
mkdir -p data/open-webui data/chromadb data/ollama
-
-
With GPU Support:
Docker-stack.yaml
services:
  openWebUI:
    image: ghcr.io/open-webui/open-webui:main
    depends_on:
        - chromadb
        - ollama
    volumes:
      - ./data/open-webui:/app/backend/data
    environment:
      DATA_DIR: /app/backend/data
      OLLAMA_BASE_URLS: http://ollama:11434
      CHROMA_HTTP_PORT: 8000
      CHROMA_HTTP_HOST: chromadb
      CHROMA_TENANT: default_tenant
      VECTOR_DB: chroma
      WEBUI_NAME: Awesome ChatBot
      CORS_ALLOW_ORIGIN: "*" # This is the current Default, will need to change before going live
      RAG_EMBEDDING_ENGINE: ollama
      RAG_EMBEDDING_MODEL: nomic-embed-text-v1.5
      RAG_EMBEDDING_MODEL_TRUST_REMOTE_CODE: "True"
    ports:
      - target: 8080
        published: 8080
        mode: overlay
    deploy:
      replicas: 1
      restart_policy:
        condition: any
        delay: 5s
        max_attempts: 3

  chromadb:
    hostname: chromadb
    image: chromadb/chroma:0.5.15
    volumes:
      - ./data/chromadb:/chroma/chroma
    environment:
      - IS_PERSISTENT=TRUE
      - ALLOW_RESET=TRUE
      - PERSIST_DIRECTORY=/chroma/chroma
    ports:
      - target: 8000
        published: 8000
        mode: overlay
    deploy:
      replicas: 1
      restart_policy:
        condition: any
        delay: 5s
        max_attempts: 3
    healthcheck:
      test: ["CMD-SHELL", "curl localhost:8000/api/v1/heartbeat || exit 1"]
      interval: 10s
      retries: 2
      start_period: 5s
      timeout: 10s

  ollama:
    image: ollama/ollama:latest
    hostname: ollama
    ports:
      - target: 11434
        published: 11434
        mode: overlay
    deploy:
      resources:
        reservations:
          generic_resources:
            - discrete_resource_spec:
                kind: "NVIDIA-GPU"
                value: 0
      replicas: 1
      restart_policy:
        condition: any
        delay: 5s
        max_attempts: 3
    volumes:
      - ./data/ollama:/root/.ollama
-
Additional Requirements:
- Ensure CUDA is Enabled, follow your OS and GPU instructions for that.
- Enable Docker GPU support, see Nvidia Container Toolkit
- Follow the Guide here on configuring Docker Swarm to with with your GPU
- Ensure GPU Resource is enabled in
/etc/nvidia-container-runtime/config.tomland enable GPU resource advertising by uncommenting theswarm-resource = "DOCKER_RESOURCE_GPU". The docker daemon must be restarted after updating these files on each node.
-
With CPU Support:
Modify the Ollama Service within
docker-stack.yamland remove the lines forgeneric_resources:ollama: image: ollama/ollama:latest hostname: ollama ports: - target: 11434 published: 11434 mode: overlay deploy: replicas: 1 restart_policy: condition: any delay: 5s max_attempts: 3 volumes: - ./data/ollama:/root/.ollama -
Deploy Docker Stack:
docker stack deploy -c docker-stack.yaml -d super-awesome-ai
Using Docker with WSL (Windows Subsystem for Linux)
This guide provides instructions for setting up Docker and running Open WebUI in a Windows Subsystem for Linux (WSL) environment.
Step 1: Install WSL
If you haven't already, install WSL by following the official Microsoft documentation:
Step 2: Install Docker Desktop
Docker Desktop is the easiest way to get Docker running in a WSL environment. It handles the integration between Windows and WSL automatically.
-
Download Docker Desktop: https://www.docker.com/products/docker-desktop/
-
Install Docker Desktop: Follow the installation instructions, making sure to select the "WSL 2" backend during the setup process.
Step 3: Configure Docker Desktop for WSL
-
Open Docker Desktop: Start the Docker Desktop application.
-
Enable WSL Integration:
- Go to Settings > Resources > WSL Integration.
- Make sure the "Enable integration with my default WSL distro" checkbox is selected.
- If you are using a non-default WSL distribution, select it from the list.
Step 4: Run Open WebUI
Now you can run Open WebUI by following the standard Docker instructions from within your WSL terminal.
docker run -d -p 3000:8080 --add-host=host.docker.internal:host-gateway -v open-webui:/app/backend/data -e WEBUI_SECRET_KEY=your-secret-key --name open-webui --restart always ghcr.io/open-webui/open-webui:mainImportant Notes
-
Run Docker Commands in WSL: Always run
dockercommands from your WSL terminal, not from PowerShell or Command Prompt. -
File System Access: When using volume mounts (
-v), make sure the paths are accessible from your WSL distribution.
Open WebUI supports Python 3.11 and 3.12. Python 3.13 is not supported yet: a handful of our dependencies still need to ship 3.13-compatible releases, and until they do, installs on 3.13 will fail or break at runtime.
- For production, run the Docker image or use the latest Python 3.11. This is the combination we test against most heavily.
- Python 3.12 also works, but we have seen very rare reports of odd behaviour on 3.12 that we have not reproduced on 3.11. If something inexplicable happens on 3.12, drop to the latest 3.11 first.
- pip
- uv
- Conda
- Venv
pip install open-webui
open-webui serve
Open WebUI is now on http://localhost:8080. Set DATA_DIR to choose where your data lives, for example DATA_DIR=~/.open-webui open-webui serve.
Command not found? Activate the environment you installed into; the open-webui command lives in its bin folder (Scripts on Windows).
Need a fix that is not released yet? PyPI carries releases only. Run the Docker :dev image beside your install with its own volume, or run from the dev branch as described in Developing Open WebUI.
Uninstall
-
Uninstall the package:
pip uninstall open-webui -
Remove data (optional, deletes all data):
rm -rf ~/.open-webui
Updating with Python
To update your locally installed Open-WebUI package to the latest version using pip, follow these simple steps:
pip install -U open-webuiThe -U (or --upgrade) flag ensures that pip upgrades the package to the latest available version.
After upgrading, restart the server and verify it starts correctly:
open-webui serveIf you run Open WebUI with UVICORN_WORKERS > 1 (e.g., in a production environment), you MUST ensure the update migration runs on a single worker first to prevent database schema corruption.
Steps for proper update:
- Update
open-webuiusingpip. - Start the application with
UVICORN_WORKERS=1environment variable set. - Wait for the application to fully start and complete migrations.
- Stop and restart the application with your desired number of workers.
For version pinning, rollback, and backup procedures, see the full update guide.
Installation with uv
The uv runtime manager ensures seamless Python environment management for applications like Open WebUI. Follow these steps to get started:
1. Install uv
Pick the appropriate installation command for your operating system:
-
macOS/Linux:
curl -LsSf https://astral.sh/uv/install.sh | sh -
Windows:
powershell -ExecutionPolicy ByPass -c "irm https://astral.sh/uv/install.ps1 | iex"
2. Run Open WebUI
Once uv is installed, running Open WebUI is a breeze. Use the command below, ensuring to set the DATA_DIR environment variable to avoid data loss. Example paths are provided for each platform:
-
macOS/Linux:
DATA_DIR=~/.open-webui uvx --python 3.11 open-webui@latest serve -
Windows (PowerShell):
$env:DATA_DIR="C:\open-webui\data"; uvx --python 3.11 open-webui@latest serve
Open WebUI is now running at http://localhost:8080.
Setting DATA_DIR ensures your chats and settings are saved in a predictable location. If you don't set it, uvx might store it in a temporary folder that gets deleted when the process ends.
Uninstall
To remove Open WebUI when running with uvx:
-
Stop the Server: Press
Ctrl+Cin the terminal where it's running. -
Uninstall from UV: Enter
uv tool uninstall open-webui -
Available cleanup commands: The
uvxcommand runs the application ephemerally or from cache. To remove cached components:uv cache clean -
Remove Data (WARNING: Deletes all data): Delete your data directory (default is
~/.open-webuior the path set inDATA_DIR):rm -rf ~/.open-webui
Updating with Python
To update your locally installed Open-WebUI package to the latest version using pip, follow these simple steps:
pip install -U open-webuiThe -U (or --upgrade) flag ensures that pip upgrades the package to the latest available version.
After upgrading, restart the server and verify it starts correctly:
open-webui serveIf you run Open WebUI with UVICORN_WORKERS > 1 (e.g., in a production environment), you MUST ensure the update migration runs on a single worker first to prevent database schema corruption.
Steps for proper update:
- Update
open-webuiusingpip. - Start the application with
UVICORN_WORKERS=1environment variable set. - Wait for the application to fully start and complete migrations.
- Stop and restart the application with your desired number of workers.
For version pinning, rollback, and backup procedures, see the full update guide.
Install with Conda
-
Create a Conda Environment:
conda create -n open-webui python=3.11 -
Activate the Environment:
conda activate open-webui -
Install Open WebUI:
pip install open-webui -
Start the Server:
open-webui serve
If your terminal says the command doesn't exist:
- Ensure your conda environment is activated (
conda activate open-webui). - If you want to store your data in a specific place, use (Linux/Mac):
DATA_DIR=./data open-webui serveor (Windows):$env:DATA_DIR=".\data"; open-webui serve
Uninstall
-
Remove the Conda Environment:
conda remove --name open-webui --all -
Remove Data (WARNING: Deletes all data): Delete your data directory (usually
~/.open-webuiunless configured otherwise):rm -rf ~/.open-webui
Updating with Python
To update your locally installed Open-WebUI package to the latest version using pip, follow these simple steps:
pip install -U open-webuiThe -U (or --upgrade) flag ensures that pip upgrades the package to the latest available version.
After upgrading, restart the server and verify it starts correctly:
open-webui serveIf you run Open WebUI with UVICORN_WORKERS > 1 (e.g., in a production environment), you MUST ensure the update migration runs on a single worker first to prevent database schema corruption.
Steps for proper update:
- Update
open-webuiusingpip. - Start the application with
UVICORN_WORKERS=1environment variable set. - Wait for the application to fully start and complete migrations.
- Stop and restart the application with your desired number of workers.
For version pinning, rollback, and backup procedures, see the full update guide.
Using Virtual Environments
Create isolated Python environments using venv.
Venv Steps
-
Create a Virtual Environment:
python3 -m venv venv -
Activate the Virtual Environment:
-
On Linux/macOS:
source venv/bin/activate -
On Windows:
venv\Scripts\activate
-
-
Install Open WebUI:
pip install open-webui -
Start the Server:
open-webui serve
If your terminal says the command doesn't exist:
- Ensure your virtual environment is activated (Step 2).
- If you want to store your data in a specific place, use:
DATA_DIR=./data open-webui serve
Uninstall
-
Delete the Virtual Environment: Simply remove the
venvfolder:rm -rf venv -
Remove Data (WARNING: Deletes all data): Delete your data directory (usually
~/.open-webuiunless configured otherwise):rm -rf ~/.open-webui
Updating with Python
To update your locally installed Open-WebUI package to the latest version using pip, follow these simple steps:
pip install -U open-webuiThe -U (or --upgrade) flag ensures that pip upgrades the package to the latest available version.
After upgrading, restart the server and verify it starts correctly:
open-webui serveIf you run Open WebUI with UVICORN_WORKERS > 1 (e.g., in a production environment), you MUST ensure the update migration runs on a single worker first to prevent database schema corruption.
Steps for proper update:
- Update
open-webuiusingpip. - Start the application with
UVICORN_WORKERS=1environment variable set. - Wait for the application to fully start and complete migrations.
- Stop and restart the application with your desired number of workers.
For version pinning, rollback, and backup procedures, see the full update guide.
- Helm
Helm Setup for Kubernetes
Helm helps you manage Kubernetes applications.
Prerequisites
- Kubernetes cluster is set up.
- Helm is installed.
Helm Steps
-
Add Open WebUI Helm Repository:
helm repo add open-webui https://open-webui.github.io/helm-charts helm repo update -
Install Open WebUI Chart:
helm install openwebui open-webui/open-webui -
Verify Installation:
kubectl get pods
If you intend to scale Open WebUI using multiple nodes/pods/workers in a clustered environment, you need to setup a NoSQL key-value database (Redis). There are some environment variables that need to be set to the same value for all service-instances, otherwise consistency problems, faulty sessions and other issues will occur!
Important: The default vector database (ChromaDB) uses a local SQLite-backed client that is not safe for multi-replica or multi-worker deployments. SQLite connections are not fork-safe, and concurrent writes from multiple processes will crash workers instantly. You must switch to an external vector database (PGVector, Milvus, Qdrant) via VECTOR_DB, or run ChromaDB as a separate HTTP server via CHROMA_HTTP_HOST.
For the complete step-by-step scaling walkthrough, see Scaling Open WebUI. For troubleshooting multi-replica issues, see the Scaling & HA guide.
If you run Open WebUI with multiple replicas/pods (replicaCount > 1) or UVICORN_WORKERS > 1, you MUST scale down to a single replica/pod during updates.
- Scale down deployment to 1 replica.
- Apply the update (new image version).
- Wait for the pod to be fully ready (database migrations complete).
- Scale back up to your desired replica count.
Failure to do this can result in database corruption due to concurrent migrations.
Access the WebUI
You can access Open WebUI by port-forwarding or configuring an Ingress.
Ingress Configuration (Nginx)
If you are using the NGINX Ingress Controller, you can enable session affinity (sticky sessions) to improve WebSocket stability. Add the following annotation to your Ingress resource:
metadata:
  annotations:
    nginx.ingress.kubernetes.io/affinity: "cookie"
    nginx.ingress.kubernetes.io/session-cookie-name: "open-webui-session"
    nginx.ingress.kubernetes.io/session-cookie-expires: "172800"
    nginx.ingress.kubernetes.io/session-cookie-max-age: "172800"
This ensures that a user's session remains connected to the same pod, reducing issues with WebSocket connections in multi-replica setups (though correct Redis configuration makes this less critical).
Uninstall
-
Uninstall the Helm Release:
helm uninstall openwebui -
Remove Persistent Volume Claims (WARNING: Deletes all data): Helm does not automatically delete PVCs to prevent accidental data loss. You must delete them manually if you want to wipe everything.
kubectl delete pvc -l app.kubernetes.io/instance=openwebui
Desktop App
Download the desktop app from github.com/open-webui/desktop. It runs Open WebUI natively on your system without Docker or manual setup.
For production deployments, install via Docker or Python.
- Pinokio.computer
Pinokio.computer Installation
For installation via Pinokio.computer, visit their website:
Support for this installation method is provided through their website.
Open it
Docker: http://localhost:3000. Python and the desktop app: http://localhost:8080. The first start takes a minute.
Nothing loads? Run docker logs -f open-webui (docker compose logs -f with Compose) and wait for Application startup complete. If it never appears, see Startup & Docker Failures. Port already taken: change the left number in -p 3000:8080, or run open-webui serve --port 9999 with Python.
Create the admin account
The first screen says Get started with Open WebUI and offers Create Admin Account. That first account is the administrator: it manages users and every instance-wide setting. Everything, including this login, stays in your own volume.
Sign-up switches itself off once the admin account exists. To let other people join, turn on New Sign Ups under your avatar > Settings > Admin > Authentication; new accounts then wait as Pending until you approve them in the Admin Panel. Note the admin password: losing it locks you out of instance settings, see Reset Admin Password.
Your avatar > Settings is yours alone (theme, language). The Admin section inside it applies to the whole instance. Understanding Settings explains the split.
Connect a model provider
Open WebUI has no models of its own. Go to your avatar > Settings > Admin > Connections.
Ollama on this machine? It is picked up automatically at http://host.docker.internal:11434 from Docker (that is what --add-host in step 1 is for) or http://localhost:11434 from Python, and shows under Manage Ollama API Connections. As the admin, download a model by typing its name into the model selector of a new chat and confirming the pull. Ollama on another machine: -e OLLAMA_BASE_URL=http://server:11434, or set the URL on the connection.
An API key from OpenAI, Anthropic or any OpenAI-compatible provider? Click the + next to Manage OpenAI API Connections, enter the provider URL (OpenAI: https://api.openai.com/v1) and your key, then Save. Models are listed automatically.
Guides: Ollama · OpenAI · Anthropic · OpenAI-compatible APIs and local servers · all providers
Ollama on the host has to listen on 0.0.0.0 when Open WebUI runs in Docker: Connection to Ollama Server. For API providers, check the URL and key; some do not publish a model list and need the model IDs entered under Model IDs on the connection: OpenAI-compatible providers.
Send your first message
Click New Chat, pick a model in the selector inside the message box, type, press Enter. Drop a file into the chat to ask questions about it.
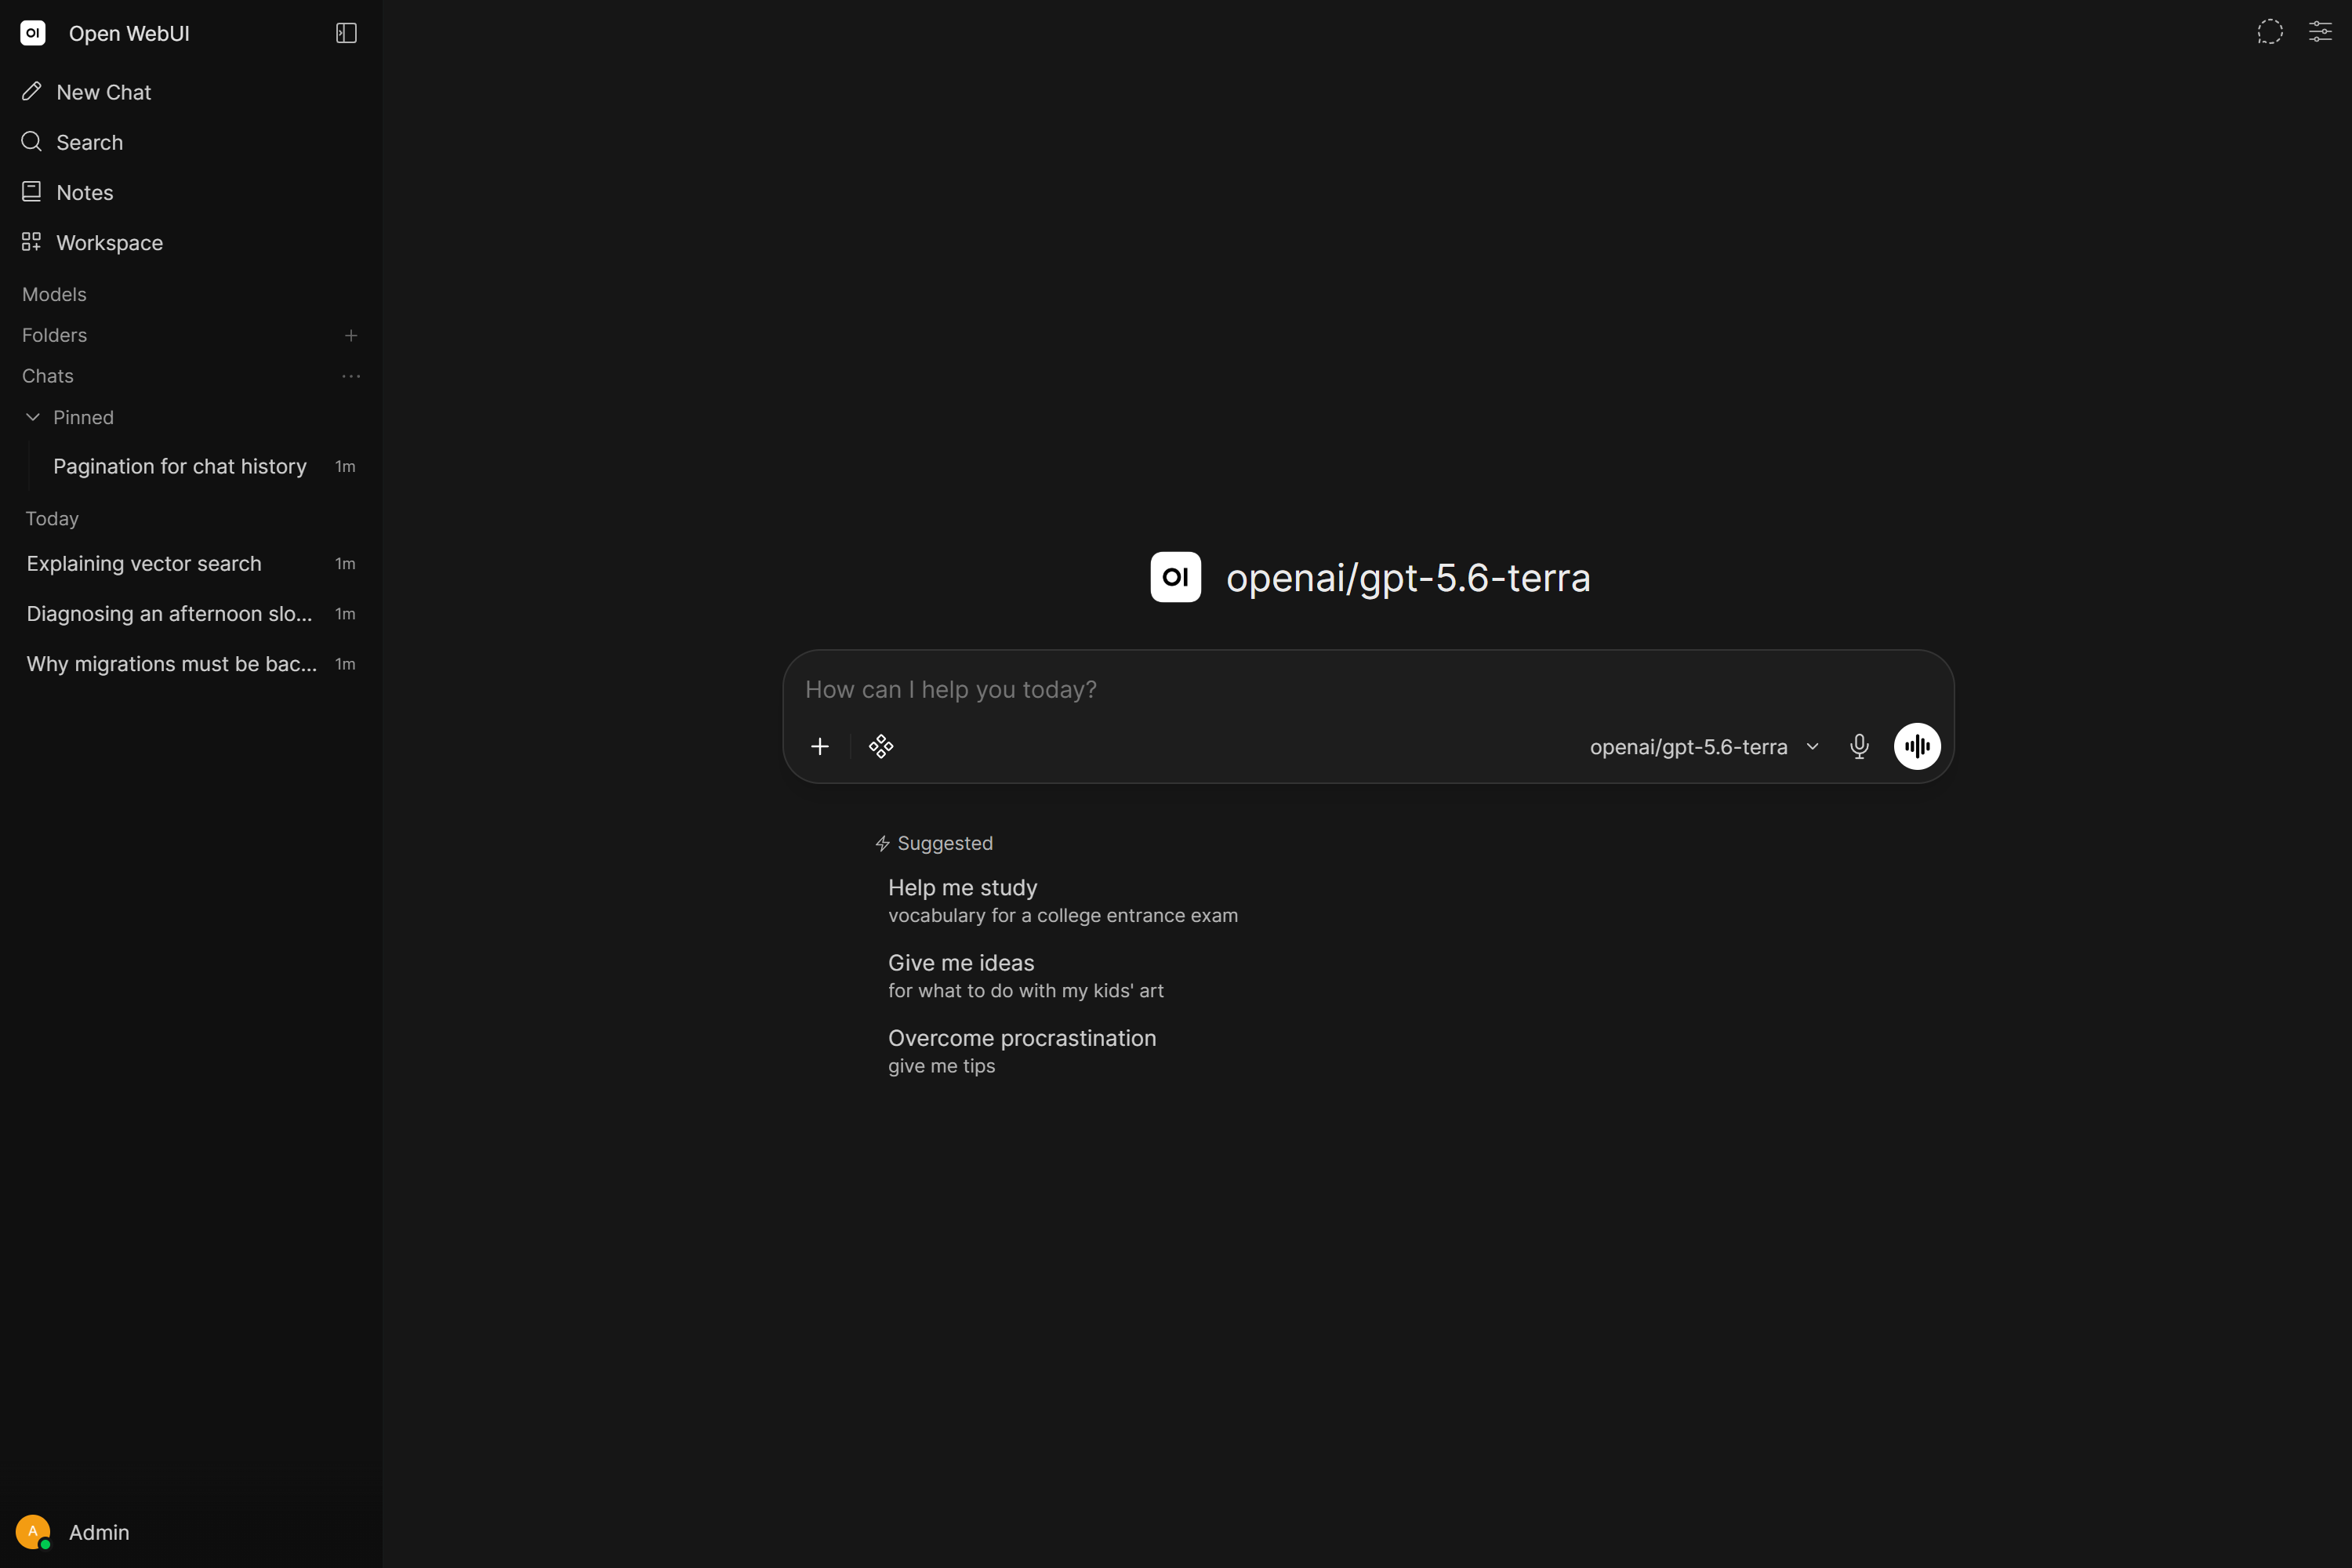
No models in the selector: back to step 4. The reply stays empty or the chat hangs behind a reverse proxy: WebSocket troubleshooting.
That is the whole install. Everything below is optional.
Where to go next
Essentials for Open WebUI continues from here. It covers what most people set up in their first week:
| Plugins | Tools and Functions from the community catalog; the feature you are missing usually exists as one. |
| Tool calling | Native mode lets the model decide when to search, read files or save memory. |
| Task models | Titles, tags and autocomplete run on a model of their own; point them at a small one. |
| Context management | Why long chats hit a wall and how Context Compaction handles it. |
| Basic RAG | Chat with your own documents, in a chat or as a knowledge base. |
| Web search | Pick a search provider and the model searches when a question needs it. |
| Open Terminal | A sandboxed shell the model can build and run things in. |
Keep it running
- Update: pull the new image and recreate the container with the step 1 command, same
WEBUI_SECRET_KEY; your data is in the volume. Updating - Back up the volume before every update: Backup & Restore
- Share it with others on your network or team: Sharing Open WebUI. Read the hardening guide before exposing it beyond your machine.
- Install it as an app on your phone or desktop: Open WebUI as an App
- Outbound calls: a stock install makes these on its own. A version check to GitHub, off with
ENABLE_VERSION_UPDATE_CHECK=false. A model-list request to the default OpenAI connection, gone once you delete that connection or setENABLE_OPENAI_API=false. An update check for the local embedding model on Hugging Face at every start, off withRAG_EMBEDDING_MODEL_AUTO_UPDATE=false.
Want an autonomous agent with terminal, file and web access? Connect an Agent. Questions: Discord. Bugs: GitHub Issues.