Ollama
Overview
Open WebUI makes it easy to connect and manage your Ollama instance. This guide will walk you through setting up the connection, managing models, and getting started.
Protocol-Oriented Design
Open WebUI is designed to be Protocol-Oriented. This means that when we refer to "Ollama", we are specifically referring to the Ollama API Protocol (typically running on port 11434).
While some tools may offer basic compatibility, this connection type is optimized for the unique features of the Ollama service, such as native model management and pulling directly through the Admin UI.
If your backend is primarily based on the OpenAI standard (like LocalAI or Docker Model Runner), we recommend using the OpenAI-Compatible Server Guide for the best experience.
Step 1: Setting Up the Ollama Connection
Once Open WebUI is installed and running, it will automatically attempt to connect to your Ollama instance. If everything goes smoothly, you’ll be ready to manage and use models right away.
However, if you encounter connection issues, the most common cause is a network misconfiguration. You can refer to our connection troubleshooting guide for help resolving these problems.
Step 2: Managing Your Ollama Instance
To manage your Ollama instance in Open WebUI, follow these steps:
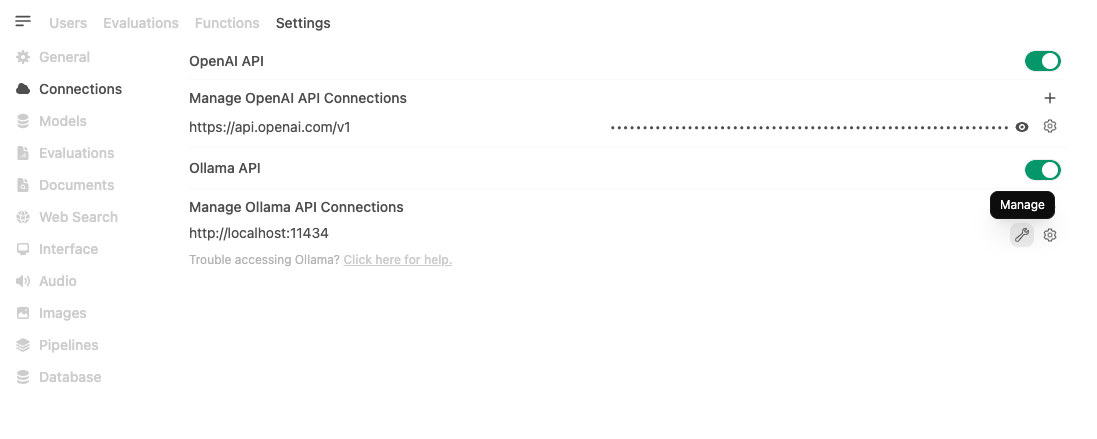
- Go to Settings > Admin > Connections in Open WebUI.
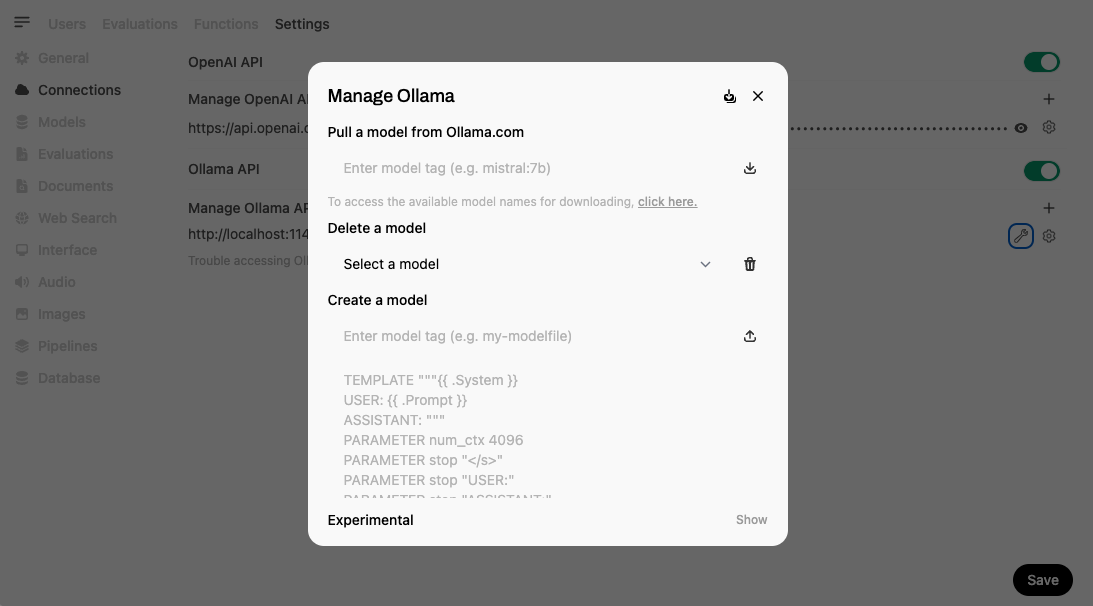
- Find your instance under Manage Ollama API Connections and click Manage (the download icon). From here, you can download models, configure settings, and manage your connection to Ollama.
Connection Tips
- Docker Users: If Ollama is running on your host machine, use
http://host.docker.internal:11434as the URL. - Load Balancing: You can add multiple Ollama instances. Open WebUI will distribute requests between them using a random selection strategy, providing basic load balancing for concurrent users.
- Note: To enable this, ensure the Model IDs match exactly across instances. If you use Prefix IDs, they must be identical (or empty) for the models to merge into a single entry.
Advanced Configuration
- Prefix ID: If you have multiple Ollama instances serving the same model names, use a prefix (e.g.,
remote/) to distinguish them. - Model IDs (Filter): Make specific models visible by listing them here (whitelist). Leave empty to show all. Each ID goes on the list once: spaces around what you type are stripped off, and an ID that is already listed is refused with Model ID is already added.
When using multiple Ollama instances (especially across networks), connection delays can occur if an endpoint is unreachable. You can adjust the timeout using:
# Lower the timeout (default is 10 seconds) for faster failover
AIOHTTP_CLIENT_TIMEOUT_MODEL_LIST=3
If you've saved an unreachable URL and can't access Settings to fix it, see the Model List Loading Issues troubleshooting guide.
Here’s what the management screen looks like:
A Quick and Efficient Way to Download Models
If you’re looking for a faster option to get started, you can download models directly from the Model Selector. Simply type the name of the model you want, and if it’s not already available, Open WebUI will prompt you to download it from Ollama.
Here’s an example of how it works:
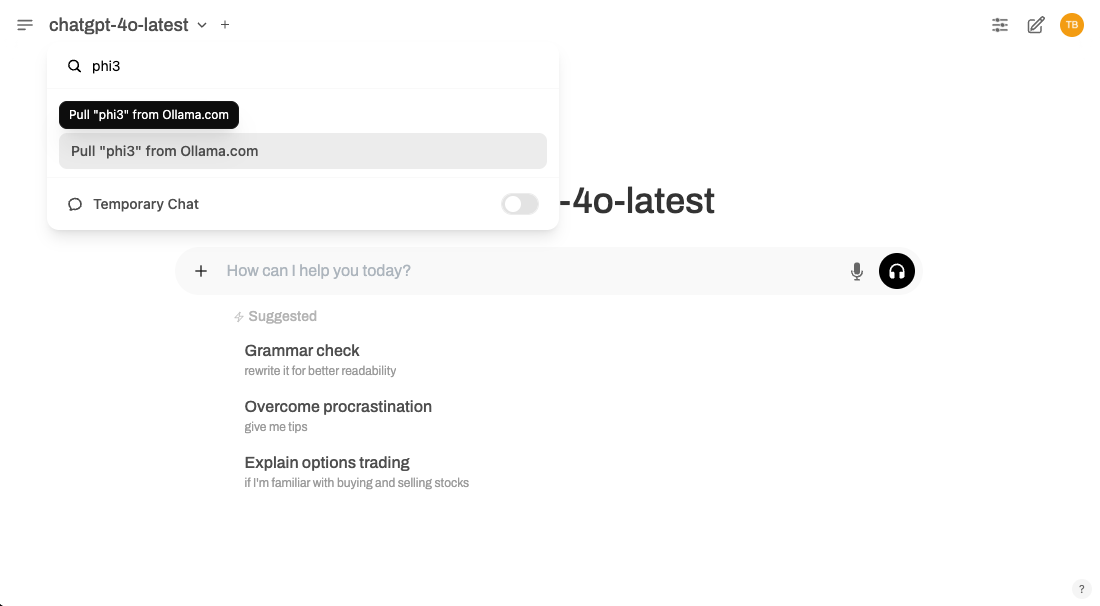
This method is perfect if you want to skip navigating through the Admin Settings menu and get right to using your models.
Downloading GGUF Models from Hugging Face
Ollama can also download GGUF models straight from Hugging Face. In Pull a model from Ollama.com or the model selector, enter the model as hf.co/{username}/{repository}:{quantization}, for example hf.co/ggml-org/gemma-3-270m-it-GGUF:Q8_0. The quantization matches the one in the GGUF file's name, such as Q4_K_M or Q8_0. The model is then listed under that full name. See Hugging Face's Ollama guide for which repositories work.
Updating and Deleting Models
Both live in the same Manage dialog as downloading (see Step 2). They act only on the Ollama server behind the connection whose Manage you opened, so with several Ollama connections, open Manage on each one you want to change.
Updating All Models
Next to Pull a model from Ollama.com, the Update All Models button pulls every model on that server again, one at a time, which brings each one up to the latest version of its tag. Ollama only downloads what changed, so a model that is already current finishes quickly.
While it runs, the dialog shows Updating "model-name" with a progress bar. Cancel stops the model that is downloading and skips the rest. If a model cannot be pulled, for example one you created yourself rather than downloaded from Ollama.com, the update skips it and moves on to the next one. When the run ends, Open WebUI shows All models are up to date.
After an update, a model that was already loaded keeps running the old version until it is unloaded. See Unloading Loaded Models.
Deleting a Model
- Under Delete a model, pick the model from Select a model. Each entry shows its size on disk.
- Click Delete Model and confirm.
Deleting removes the model from the Ollama server itself and frees its disk space, so it disappears for every user of that connection. To stop offering a model without deleting it, list only the models you want to offer in the connection's Model IDs (Filter) instead (see Advanced Configuration).
Creating a Model
Create a model, also in the Manage dialog, makes a new model on that Ollama server from one it already has, with its own system prompt or parameters. Nothing new is downloaded, so it takes a few seconds.
-
Enter a name for the new model, for example
pirate-gemma. -
In the box below it, describe the model as JSON, using the fields of Ollama's create API.
fromis the model to build on, and must already be on that server. For example:{"from": "gemma3:270m", "system": "You answer in one short sentence.", "parameters": {"temperature": 0.3, "num_ctx": 8192}} -
Click Create Model, the button next to the name. It stays disabled until both the name and the JSON are filled in.
When Ollama finishes, Open WebUI shows success, and the new model appears in the model selector as pirate-gemma:latest. If the JSON can't be read, the error is shown and nothing is sent. If the from model isn't on that server, Ollama tries to download it from Ollama.com instead and fails with pull model manifest: file does not exist when no such model exists there.
Ollama uses the model's own system prompt only when a chat sends none. A system prompt from the model's settings in Workspace > Models, from a user's settings, or added by a filter replaces it. To give a model a system prompt that always applies in Open WebUI, set it in Workspace > Models instead.
Unloading Loaded Models
Open WebUI shows a green "Loaded" indicator next to any Ollama model that is currently kept warm by the runtime, and admins see an Eject button on the model row to unload it without restarting the server. Behind the scenes, Open WebUI calls POST /api/models/unload (admin-only), which forwards a keep_alive=0 generate call to every Ollama node serving that model.
This is useful for freeing GPU/VRAM when juggling multiple large models, or for forcing a fresh load after pulling a new revision. Trying to unload a model that the connected provider does not support unloading returns an error rather than silently failing.
Using Reasoning / Thinking Models
Ollama separates a model's thinking from its answer on its own. Since Ollama v0.9.0, models with thinking support (Qwen3, DeepSeek-R1, DeepSeek-V3.1, GPT-OSS) return the trace in a separate thinking field, and Open WebUI shows it in a collapsible section above the answer. No server-side flag is involved, and ollama serve takes none.
Controlling Thinking
The think (Ollama) control under Chat Controls > Advanced Params (or per model in the model editor) is sent to Ollama as the think parameter:
| Setting | What Ollama receives |
|---|---|
| Default | Nothing. Ollama's own default applies, which is thinking on for models that support it. |
| On | true |
| Custom | A thinking level: low, medium, high or max. GPT-OSS accepts only a level. |
| Off | false |
A model that writes its reasoning inline as <think>...</think> text instead of using Ollama's thinking field is handled by the Reasoning Tags setting. See the Reasoning & Thinking Models Guide for both settings and the troubleshooting steps.
Context Length (num_ctx) and OLLAMA_CONTEXT_LENGTH
How much of your conversation a model actually sees is set by the context length, and for Ollama it can come from two places, one of which quietly overrides the other:
OLLAMA_CONTEXT_LENGTHis set on the Ollama server and is the default context length Ollama uses for a model. Since Ollama v0.15.5, Ollama picks this default from available VRAM:4096below 24 GiB,32768from 24 to 48 GiB, and262144at 48 GiB and above (see Ollama's context length documentation).num_ctxis an Open WebUI advanced parameter (Chat Controls > Advanced Parameters, or per model in the model editor). It is unset by default, so out of the box Ollama'sOLLAMA_CONTEXT_LENGTHapplies.
num_ctx overrides OLLAMA_CONTEXT_LENGTHIf num_ctx is set anywhere in Open WebUI (a model preset's parameters or the chat's Advanced Parameters), Open WebUI sends it to Ollama on every request, and a per-request num_ctx overrides the server's OLLAMA_CONTEXT_LENGTH. Toggling the num_ctx control on pre-fills it with 2048, which is very small, so it is easy to cap a model at 2048 tokens without realizing it, even after raising OLLAMA_CONTEXT_LENGTH on the Ollama side.
A context that is too small silently truncates the prompt. This is most visible with Native function calling, where tool schemas are injected into the prompt: at 2048 tokens the model can run out of room and return a blank response, or emit a raw tool-call JSON blob instead of actually calling the tool. Raising the context resolves it.
What to do:
- To set a default for all Ollama models, set
OLLAMA_CONTEXT_LENGTHon the Ollama server and leavenum_ctxunset in Open WebUI so it is not overridden. - To set it per model or per chat, set
num_ctxto a realistic value for the model (for example8192,16384or the model's maximum), not the2048pre-fill. Remember it overridesOLLAMA_CONTEXT_LENGTH. - A larger context uses more VRAM and RAM, so size it to what your hardware can hold.
All Set!
That’s it! Once your connection is configured and your models are downloaded, you’re ready to start using Ollama with Open WebUI. Whether you’re exploring new models or running your existing ones, Open WebUI makes everything simple and efficient.
If you run into any issues or need more guidance, check out our help section for detailed solutions. Enjoy using Ollama! 🎉