This tutorial is a community contribution and is not supported by the Open WebUI team. It serves only as a demonstration on how to customize Open WebUI for your specific use case. Want to contribute? Check out the contributing tutorial.
Integrating Continue.dev VSCode Extension with Open WebUI
Download Extension
You can download the VSCode extension on the Visual Studio Marketplace or directly via the EXTENSION:MARKETPLACE within VSCode by searching for continue.
Once installed, you can access the application via the continue tab in the side bar of VSCode.
VSCode side bar icon:
![]()
Setup
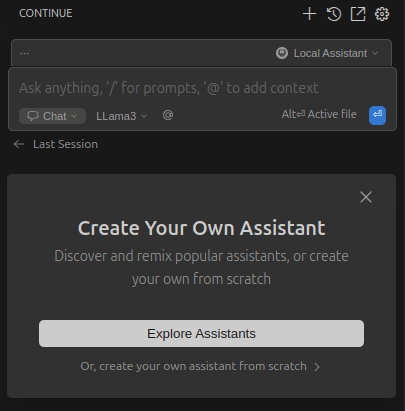
Click on the assistant selector to the right of the main chat input. Then hover over Local Assistant and click on the settings icon (⚙️).
This will open the config.yaml file in your editor. Here you can change the settings of your Local Assistant.
Currently the ollama provider does not support authentication so we cannot use this provider with Open WebUI.
However Ollama and Open WebUI both have compatibility with OpenAI API spec. Read more about the specification in the Ollama blog post.
We can still setup continue.dev to use the openai provider which will allow us to use Open WebUI's authentication token.
Example config
Below you find an example config for Llama3 as the model with a local Open WebUI setup.
name: Local Assistant
version: 1.0.0
schema: v1
models:
  - name: LLama3
    provider: openai
    model: /models/Meta-Llama-3-8B-Instruct-Q4_K_M.gguf
    env:
      useLegacyCompletionsEndpoint: false
    apiBase: http://localhost:3000/api
    apiKey: YOUR_OPEN_WEBUI_API_KEY
    roles:
      - chat
      - edit
context:
  - provider: code
  - provider: docs
  - provider: diff
  - provider: terminal
  - provider: problems
  - provider: folder
  - provider: codebase
Miscellaneous Configuration Settings
These values are needed by the extension to work properly. Find more information in the official config guide.
name: Local Assistant
version: 1.0.0
schema: v1
The context section provides additional information to the models. Find more information in the official config guide and in the context provider guide.
context:
  - provider: code
  - provider: docs
  - provider: diff
  - provider: terminal
  - provider: problems
  - provider: folder
  - provider: codebase
Models
The models section is where you specify all models you want to add. Find more information in the official models guide.
models:
  - ...
Name
Sets the name for the model you want to use. This will be displayed within the chat input of the extension.
name: LLama3
Provider
Specifies the method used to communicate with the API, which in our case is the OpenAI API endpoint provided by Open WebUI.
provider: openai
Model
This is the actual name of your model in Open WebUI. Navigate to Admin Panel > Settings > Models, and then click on your preferred LLM.
Below the user-given name, you'll find the actual model name.
model: /models/Meta-Llama-3-8B-Instruct-Q4_K_M.gguf
Legacy completions endpoint
This setting is not needed for Open WebUI, though more information is available in the original guide.
env:
  useLegacyCompletionsEndpoint: false
APIBase
This is a crucial step: you need to direct the continue.dev extension requests to your Open WebUI instance.
Either use an actual domain name if the instance is hosted somewhere (e.g. https://example.com/api) or your localhost setup (e.g. http://localhost:3000/api).
You can find more information about the URLs in the API Endpoints guide.
apiBase: http://localhost:3000/api
API Key
To authenticate with your Open WebUI instance, you'll need to generate an API key. Follow the instructions in this guide to create it.
apiKey: YOUR_OPEN_WEBUI_API_KEY
Roles
The roles will allow your model to be used by the extension for certain tasks. For the beginning you can choose chat and edit.
You can find more information about roles in the official roles guide.
roles:
  - chat
  - edit
The setup is now completed and you can interact with your model(s) via the chat input. Find more information about the features and usage of the continue.dev plugin in the official documentation.