Python Code Execution
Overview
Open WebUI provides two ways to execute Python code:
- Manual Code Execution: Run Python code blocks generated by LLMs using a "Run" button in the browser (uses Pyodide/WebAssembly).
- Code Interpreter: An AI capability that allows models to automatically write and execute Python code as part of their response (uses Pyodide or Jupyter).
Both methods support visual outputs like matplotlib charts that can be displayed inline in your chat. When using the Pyodide engine, a persistent virtual filesystem at /mnt/uploads/ is available. Files survive across code executions and page reloads, and files attached to messages are automatically placed there for your code to access.
The in-browser Pyodide engine and the Jupyter engine are legacy. They remain for zero-setup, in-chat Python, but for real workloads, full package support, and shell access use Open Terminal instead. Pyodide may be deprecated in a future release.
Code Interpreter Capability
The Code Interpreter is a model capability that enables LLMs to write and execute Python code autonomously during a conversation. When enabled, models can:
- Perform calculations and data analysis
- Generate visualizations (charts, graphs, plots)
- Process data dynamically
- Execute multi-step computational tasks
Enabling Code Interpreter
Per-Model Setup (Admin):
- Go to Settings > Admin > AI > Models
- Select the model you want to configure
- Under Capabilities, enable Code Interpreter
- Save changes
Global Configuration (Admin Panel):
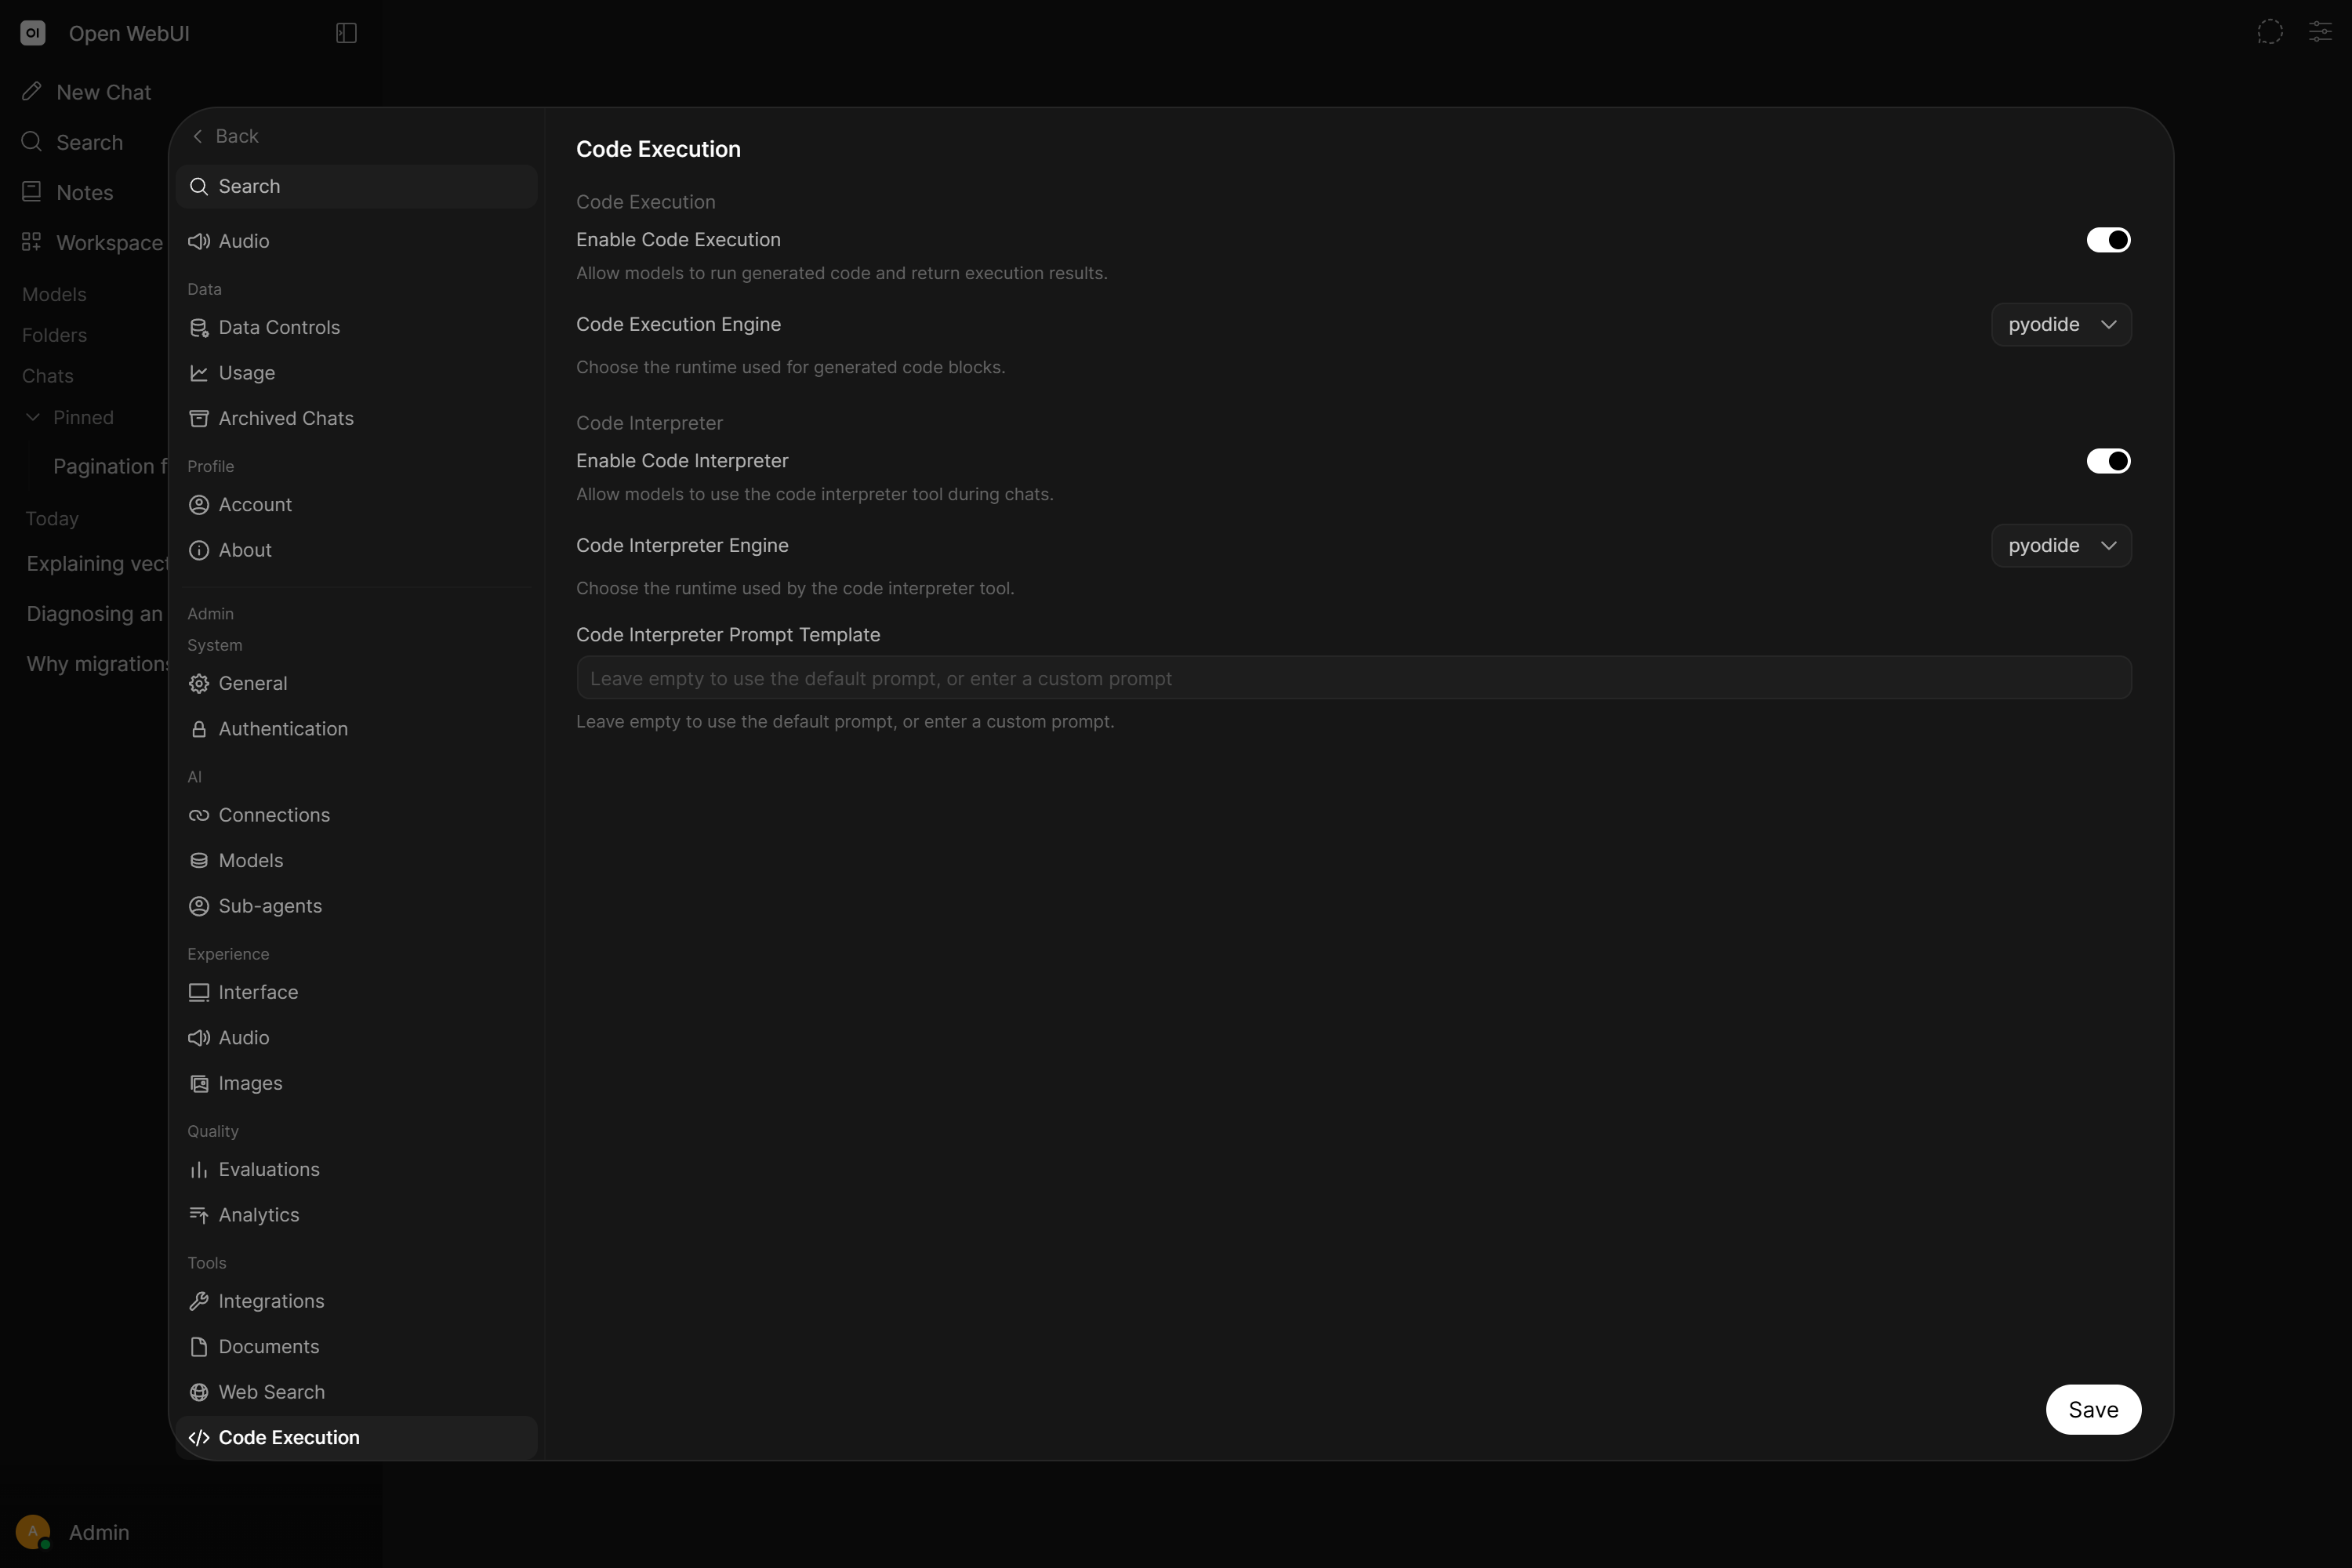
These settings can be configured at Settings → Admin → Tools → Code Execution:
- Enable/disable code interpreter
- Select engine: Pyodide (legacy) or Jupyter (legacy) (for full Python and shell access, use Open Terminal instead)
- Configure Jupyter connection settings
- Set blocked modules
Global Configuration (Environment Variables):
| Variable | Default | Description |
|---|---|---|
ENABLE_CODE_INTERPRETER | true | Enable/disable code interpreter globally |
CODE_INTERPRETER_ENGINE | pyodide | Engine to use: pyodide (browser, legacy) or jupyter (server, legacy). For full Python and shell access, use Open Terminal instead. |
CODE_INTERPRETER_PROMPT_TEMPLATE | (built-in) | Custom prompt template for code interpreter |
CODE_INTERPRETER_BLOCKED_MODULES | "" | Comma-separated module names to refuse importing. Empty by default. Blocks only direct top-level imports and is an opt-in convenience filter, not a security boundary; see the reference. |
For Jupyter configuration, see the Jupyter Notebook Integration tutorial.
When the Pyodide engine is selected, Open WebUI automatically appends a filesystem-awareness prompt to the code interpreter instructions. This tells the model about /mnt/uploads/ and how to discover user-uploaded files. When using Jupyter, this filesystem prompt is not appended (since Jupyter has its own filesystem). You do not need to include filesystem instructions in your custom CODE_INTERPRETER_PROMPT_TEMPLATE. They are added automatically.
Native Function Calling (Native Mode)
When using Native function calling mode with a capable model (e.g., GPT-5, Claude 4.5, MiniMax M2.5), the code interpreter is available as a builtin tool called execute_code. This provides a more integrated experience:
- No XML tags required: The model calls
execute_code(code)directly - Same image handling: Base64 image URLs in output are replaced with file URLs; model embeds via markdown
Requirements:
ENABLE_CODE_INTERPRETERmust be enabled globally- Model must have
code_interpretercapability enabled - Model must be in Native function calling mode (the default as of v0.10.0; only an issue if it was switched to Legacy in the model's advanced params)
For more details on builtin tools and native mode, see the Tool Development Guide.
Displaying Images Inline (matplotlib, etc.)
When using matplotlib or other visualization libraries, images can be displayed directly in the chat. For this to work correctly, the code must output the image as a base64 data URL.
Recommended Pattern for matplotlib
import matplotlib.pyplot as plt
import io
import base64

# Create your chart
plt.figure(figsize=(10, 6))
plt.bar(['A', 'B', 'C'], [4, 7, 5])
plt.title('Sample Chart')

# Output as base64 data URL (triggers automatic upload)
buf = io.BytesIO()
plt.savefig(buf, format='png', dpi=150, bbox_inches='tight')
buf.seek(0)
img_base64 = base64.b64encode(buf.read()).decode('utf-8')
print(f"data:image/png;base64,{img_base64}")
plt.close()
How Image Display Works
- The code executes and prints
data:image/png;base64,...to stdout - Open WebUI's middleware detects the base64 image data in the output
- The image is automatically uploaded and stored as a file
- The base64 string is replaced with a file URL (e.g.,
/api/v1/files/{id}/content) - The model sees this URL in the code output and can reference it in its response
- The image renders inline in the chat
The model's code should print the base64 data URL. Open WebUI intercepts this and converts it to a permanent file URL. The model should then use this resulting URL in markdown like . It should NOT paste the raw base64 string into its response text.
If you see raw base64 text appearing in chat responses, the model is incorrectly echoing the base64 instead of using the converted URL from the code output.
Example Prompt
Create a bar chart showing quarterly sales: Q1: 150, Q2: 230, Q3: 180, Q4: 310.
Expected model behavior:
- Model writes Python code using the base64 pattern above
- Code executes and outputs
data:image/png;base64,... - Open WebUI converts this to a file URL in the output (e.g.,
) - Model references this URL in its response to display the chart
Common Issues
| Issue | Cause | Solution |
|---|---|---|
| Raw base64 text appears in chat | Model output the base64 in its response text | Instruct model to only print base64 in code, not repeat it |
| Image doesn't display | Code used plt.show() without base64 output | Use the base64 pattern above instead |
| "Analyzing..." spinner stuck | Code execution timeout or error | Check backend logs for errors |
Manual Code Execution (Pyodide)
Open WebUI includes a browser-based Python environment using Pyodide (WebAssembly). This allows running Python scripts directly in your browser with no server-side setup.
The Pyodide worker is persistent: it is created once and reused across code executions. This means variables, imported modules, and files written to the virtual filesystem are retained between executions within the same session.
Running Code Manually
- Ask an LLM to write Python code
- A Run button appears in the code block
- Click to execute the code using Pyodide
- Output appears below the code block
Supported Libraries
Pyodide includes the following packages, which are auto-detected from import statements and loaded on demand:
| Package | Use case |
|---|---|
| micropip | Package installer (internal use) |
| requests | HTTP requests |
| beautifulsoup4 | HTML/XML parsing |
| numpy | Numerical computing |
| pandas | Data analysis and manipulation |
| matplotlib | Chart and plot generation |
| seaborn | Statistical data visualization |
| scikit-learn | Machine learning |
| scipy | Scientific computing |
| regex | Advanced regular expressions |
| sympy | Symbolic mathematics |
| tiktoken | Token counting for LLMs |
| pytz | Timezone handling |
The Python standard library is also fully available (json, csv, math, datetime, os, io, etc.).
The AI cannot install additional libraries beyond the list above. Any code that imports an unsupported package will fail with an import error. Packages that require C extensions, system calls, or native binaries (e.g., torch, tensorflow, opencv, psycopg2) are not available and cannot be made available in Pyodide. Pyodide is best suited for basic file analysis, simple calculations, text processing, and chart generation. For full Python package access, use Open Terminal instead.
Persistent File System
When using the Pyodide engine, a persistent virtual filesystem is mounted at /mnt/uploads/. This filesystem is backed by the browser's IndexedDB via IDBFS and provides:
- Cross-execution persistence: files written by one code execution are accessible in subsequent executions.
- Cross-reload persistence (opt-in): files survive page reloads only when
ENABLE_PYODIDE_FILE_PERSISTENCE=true(off by default). With it off, Pyodide runs sandboxed at an opaque origin and the IndexedDB-backed filesystem is not retained across reloads. - Automatic upload mounting: files attached to messages are fetched from the server and placed in
/mnt/uploads/before code execution, so the model can read them directly. - File browser panel: when Code Interpreter is enabled, a file browser appears in the chat controls sidebar. You can browse, preview, upload, download, and delete files, no terminal needed.
Working with Files in Code
import os

# List uploaded files
print(os.listdir('/mnt/uploads'))

# Read a user-uploaded CSV
import pandas as pd
df = pd.read_csv('/mnt/uploads/data.csv')
print(df.head())

# Write output to the persistent filesystem (downloadable via file browser)
df.to_csv('/mnt/uploads/result.csv', index=False)
print('Saved result.csv to /mnt/uploads/')The file browser panel lets you download any file the model creates. Ask the model to save its output to /mnt/uploads/ and it will appear in the file browser for download.
The persistent filesystem prompt and /mnt/uploads/ integration are Pyodide-only. When using the Jupyter engine, files are managed through Jupyter's own filesystem. The file browser panel is not available for Jupyter.
Example: Creating a Chart
Prompt:
"Create a bar chart with matplotlib showing: Acuity 4.1, Signify 7.2, Hubbell 5.6, Legrand 8.9. Output the chart as a base64 data URL so it displays inline."
Expected Code Output:
import matplotlib.pyplot as plt
import io
import base64

companies = ['Acuity', 'Signify', 'Hubbell', 'Legrand']
values = [4.1, 7.2, 5.6, 8.9]

plt.figure(figsize=(10, 6))
bars = plt.bar(companies, values, color=['#3498db', '#2ecc71', '#e74c3c', '#9b59b6'])

for bar, value in zip(bars, values):
    plt.text(bar.get_x() + bar.get_width()/2, bar.get_height() + 0.1,
             str(value), ha='center', va='bottom', fontsize=12)

plt.title('Company Values', fontsize=16, fontweight='bold')
plt.xlabel('Company', fontsize=12)
plt.ylabel('Value', fontsize=12)
plt.tight_layout()

buf = io.BytesIO()
plt.savefig(buf, format='png', dpi=150, bbox_inches='tight')
buf.seek(0)
print(f"data:image/png;base64,{base64.b64encode(buf.read()).decode()}")
plt.close()
The image will be automatically uploaded and displayed inline in your chat.
Browser Compatibility
Microsoft Edge: Pyodide Crashes
If Pyodide-based code execution causes Microsoft Edge to crash with a STATUS_ACCESS_VIOLATION error, this is caused by Edge's enhanced security mode.
Symptom: The browser tab or entire browser crashes when attempting to run Python code, with no useful error message.
Cause: Edge's "Enhance your security on the web" setting (found at edge://settings/privacy/security) enables stricter security mitigations that are incompatible with WebAssembly-based runtimes like Pyodide.
Solutions:
-
Disable enhanced security in Edge:
- Go to
edge://settings/privacy/security - Turn off "Enhance your security on the web"
- Go to
-
Use a different browser:
- Chrome and Firefox do not have this issue
-
Use Jupyter backend:
- Switch
CODE_INTERPRETER_ENGINEtojupyterto avoid browser-based execution entirely
- Switch
This is a known compatibility issue between Edge's enhanced security mode and WebAssembly. The same crash occurs on the official Pyodide console when this setting is enabled.
Tips for Better Results
- Mention the environment: Tell the LLM it's running in a "Pyodide environment" or "code interpreter" for better code generation
- Be explicit about output: Ask for "base64 data URL output" for images
- Use print statements: Results must be printed to appear in the output
- Check library support: Verify the libraries you need are available in Pyodide
Further Reading
- Pyodide Documentation
- Jupyter Notebook Integration
- Environment Configuration (search for
CODE_INTERPRETER)