Gemini
This tutorial is a community contribution and is not supported by the Open WebUI team. It serves only as a demonstration on how to customize Open WebUI for your specific use case. Want to contribute? Check out the contributing tutorial.
Open WebUI also supports image generation through the Google AI Studio API also known as the Gemini API.
Initial Setup
- Obtain an API key from Google AI Studio - alternatively an API Key from Google Cloud and activate the
Generative Language APIfor the project. - You most likely need to create a project and enable the
Generative Language APIin addition to adding billing information, because the image generation API is not available for free.
If you are utilizing a free API key, it is vital to have a payment method on file. The absence of a valid payment method is a frequent cause of errors during the setup process.
Alternatively, if you are using Vertex AI, you can create an API key in Google Cloud instead of a service account. This key will function correctly, provided it is assigned the appropriate permissions. And given the Generative Language API is enabled for the project.
Configuring Open WebUI
- In Open WebUI, navigate to the Settings > Admin > Images menu.
- Set the
Image Generation Enginefield toGemini. - Set the
Base URLtohttps://generativelanguage.googleapis.com/v1beta. - Enter your Google AI Studio API key.
- Enter the model you wish to use, either an Imagen model or a Gemini model.
- Set the
Gemini Endpoint Methodto match that model:predictfor Imagen,generateContentfor Gemini.
Example Minimal Setup
- Gemini 3 Pro Image (aka Nano Banana Pro)
- Gemini 3.1 Flash Image (aka Nano Banana 2)
Create Image
- Model:
gemini-3-pro-image - Image Size: (not sent to Gemini, can be left empty)
- Image Prompt Generation: on (Legacy function calling only)
- Image Generation Engine:
Gemini - Base URL:
https://generativelanguage.googleapis.com/v1beta - API Key: Enter your API Key
- Gemini Endpoint Method:
generateContent
Edit Image
- Image Edit: on
- Image Edit Engine:
Gemini - Model:
gemini-3-pro-image - Image Size: (not sent to Gemini, can be left empty)
- Base URL:
https://generativelanguage.googleapis.com/v1beta - API Key: Enter your API Key
Create Image
- Model:
gemini-3.1-flash-image - Image Size: (not sent to Gemini, can be left empty)
- Image Prompt Generation: on (Legacy function calling only)
- Image Generation Engine:
Gemini - Base URL:
https://generativelanguage.googleapis.com/v1beta - API Key: Enter your API Key
- Gemini Endpoint Method:
generateContent
Edit Image
- Image Edit: on
- Image Edit Engine:
Gemini - Model:
gemini-3.1-flash-image - Image Size: (not sent to Gemini, can be left empty)
- Base URL:
https://generativelanguage.googleapis.com/v1beta - API Key: Enter your API Key
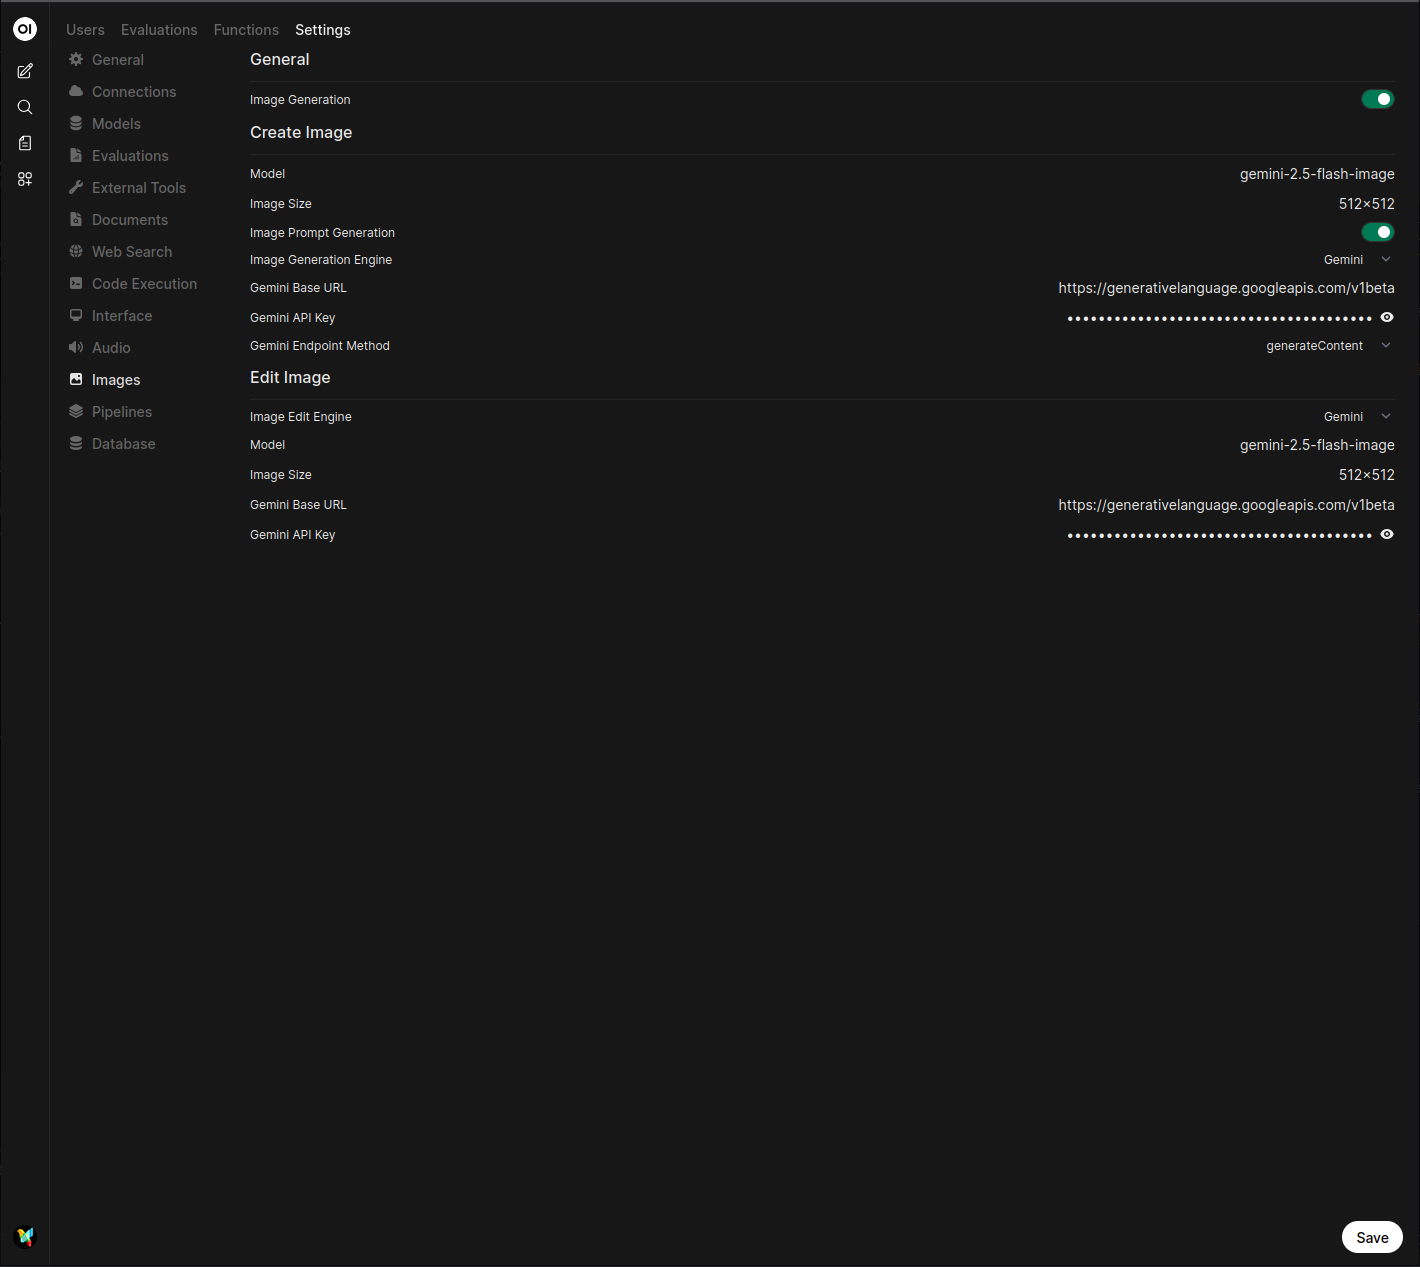
Imagen and Gemini models are served from different endpoints, so Gemini Endpoint Method has to match the model you entered.
Imagen models use predict:
https://generativelanguage.googleapis.com/v1beta/models/imagen-4.0-generate-001:predict.- Documentation for Imagen models
Gemini models use generateContent:
https://generativelanguage.googleapis.com/v1beta/models/gemini-3-pro-image:generateContent.- Documentation for Gemini models
Leaving the method empty falls back to predict, so a Gemini model such as gemini-3-pro-image fails until you switch it to generateContent.
400: [ERROR: models/gemini-3-pro-image is not found for API version v1beta, or is not supported for predict. Call ListModels to see the list of available models and their supported methods.]
LiteLLM Proxy with Gemini Endpoints
Image generation with a LiteLLM proxy using Gemini or Imagen endpoints is supported with Open WebUI. Configure the Image Generation as follows:
- In Open WebUI, navigate to the Settings > Admin > Images menu.
- Set the
Image Generation Enginefield toDefault (Open AI). - Change the
API Base URLtohttps://<your-litellm-url>:<port>/v1. - Enter your LiteLLM API key.
- The API version can be left blank.
- Enter the image model name as it appears in your LiteLLM configuration.
- Set the image size to one of the available sizes for the selected model.
To find your LiteLLM connection information, navigate to the Settings > Admin > AI > Connections menu. Your connection information will be listed under the Gemini API connection.